This popup form can be accessed via the  edit button in the top header area of the benefit view page, as shown in Figure 1. Alternatively you can access the
  edit popup form via the
  actions column menu of the Benefits tab at the
  organisation,
  programme, project,
  sub-project or
  benefit view pages, as shown in Figure 2.
![]()
Figure 1 – Access via edit button
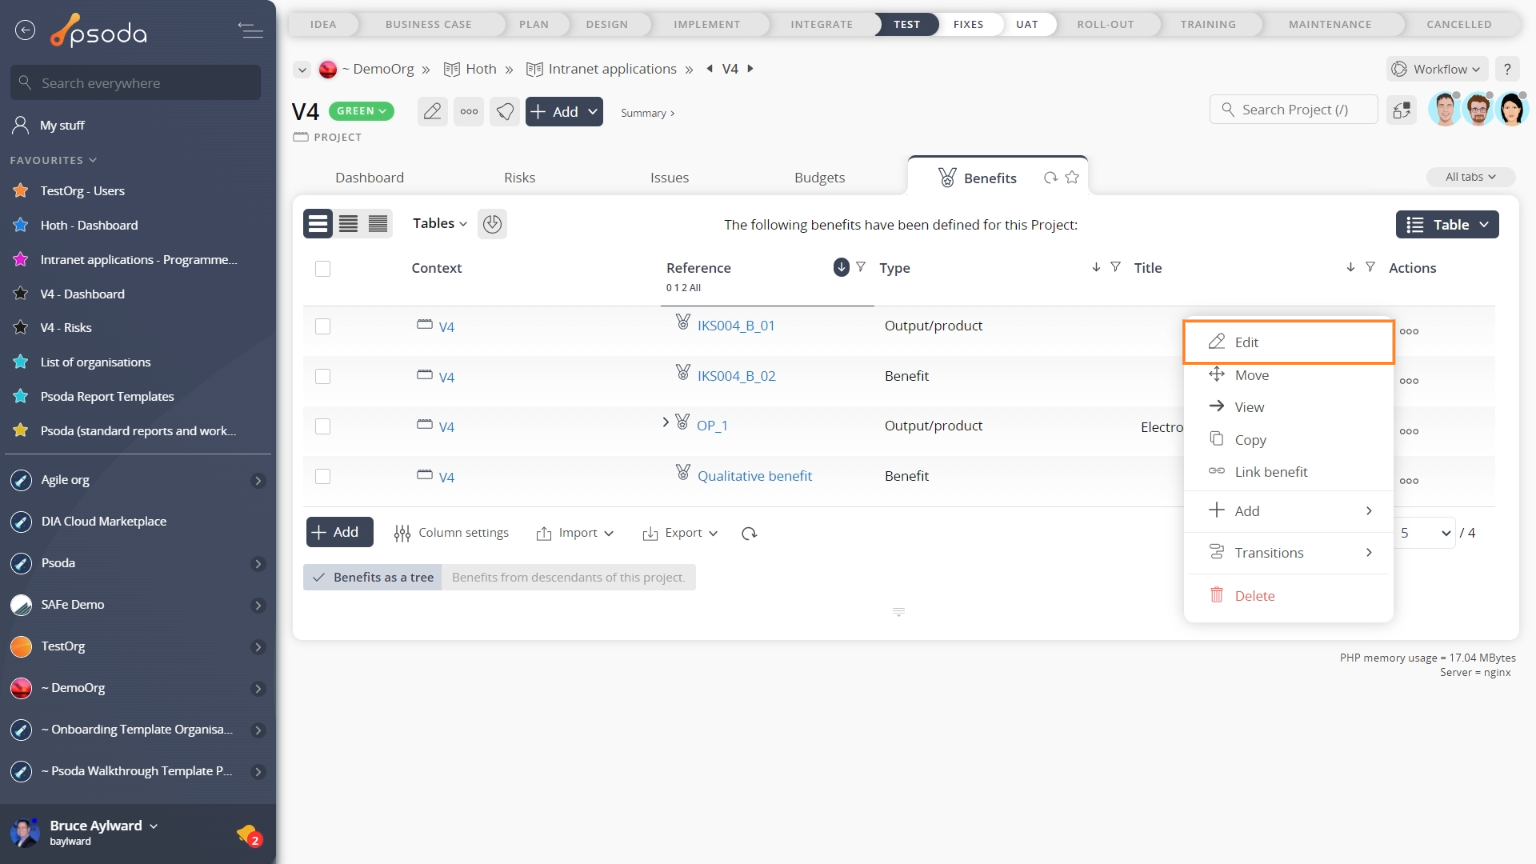
Figure 2 – Access via benefit tab
This popup is shown in Figure 3 and is used to edit an existing benefit.
Figure 3 – Edit benefit form
In Figure 3 above, the form has been broken down into three sections:
| Section 1 | This section contains a selection of important top fields: Parent asset: This read-only field shows the parent asset of this benefit. Reference*: This is the unique reference for this benefit, if this is to be edited, it must maintain unique. |
|---|---|
| Section 2 | These are the tabs that you can cycle through to edit each section of the benefit.When you navigate to a new tabbed view in this popup, any information entered in Section 3 from the previous tabbed view will be saved. This means you do not need to click on any buttons to save each tab, but can instead click on the Update button at the bottom of the popup when you wish to add your new benefit with the set details. |
| Section 3 | This information will change as you cycle through the tabs shown in Section 2, and the available fields will change accordingly. A breakdown of the field information for each tab is provided below. |
Tab breakdown
The following information provides a breakdown of each of the tabbed views that may be available for you to edit the benefit’s details under each section.Details
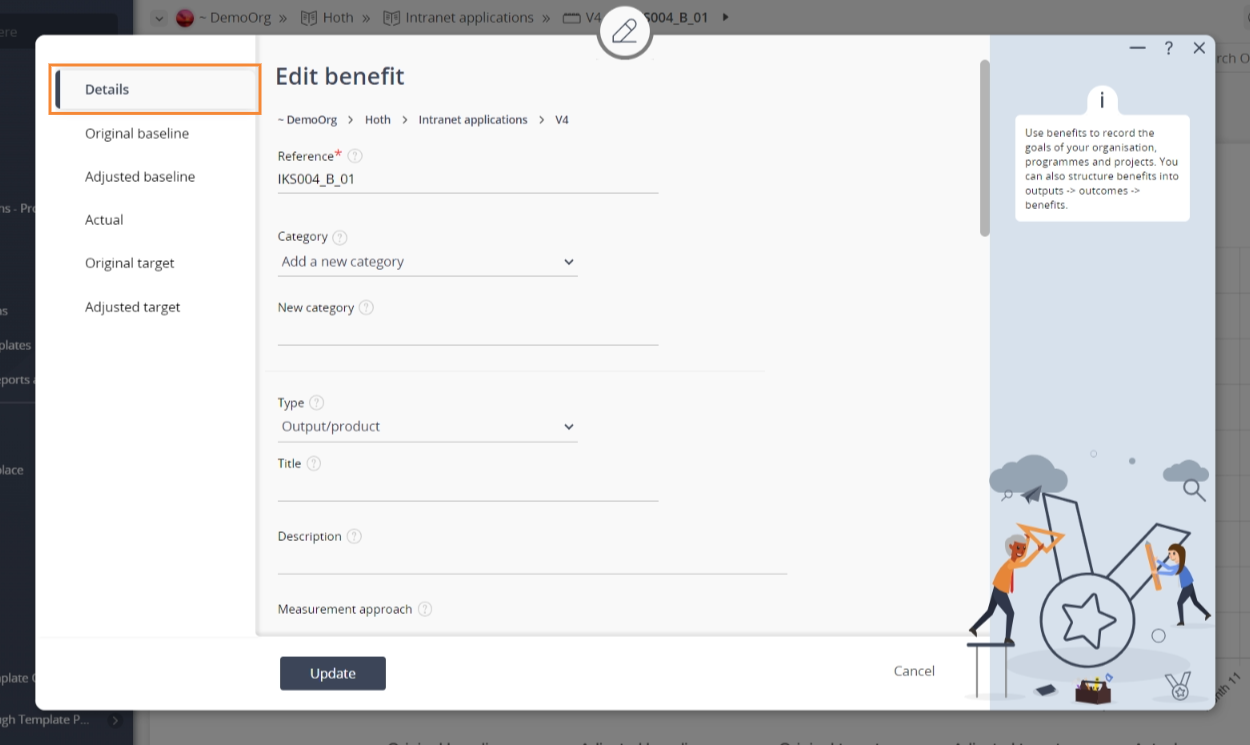
Figure 4 – Edit benefit details tab
The details for the benefit can be adjusted by clicking on the tab indicated in Figure 4 above. Each of the fields available to be customised in this tabbed view are described in the following table:| Category: | Use the provided drop-down list to select a category for this new . |
|---|---|
| (New category): | This field will only be available if you have selected the “Add a new category” in the Category field above. Here you can add a new category for this new benefit to belong to. |
| Type: | Use this drop-down list to select or change whether you would like this to be a benefit, output/product or outcome. NOTE: If you select the latter options, a number of the benefit fields described below will no longer be applicable. |
| Title: | Use this field to enter or edit the short title for this benefit. |
| Description: | Use this field to enter or edit the description of this benefit. |
| Measurement approach: | Use this field to enter or edit the description of the measurement approach for this benefit. |
| Benefit evidence: | Use this field to enter or edit the description of the evidence for this benefit. |
| Owner: | Use this drop-down list to select or change an owner for this benefit, or you have the option to select “None”. |
| Measurement start date: | Use this field to enter or edit the measurement start date for this benefit. You can use any one of the supported date formats, or by utilising the calendar control function to select this date. |
| Target realisation date: | Use this field to enter or edit the target date for achieving this benefit. You can use any one of the supported date formats, or by utilising the calendar control function to select this date. |
| Measurement interval: | Use this drop-down list to select or change how often you would like this benefit to be measured. |
| Measurement periods*: | Use this field to enter or edit how many measurement periods will occur in the financial year. |
| Measurement unit: | Use this field to enter or edit the measurement unit for this benefit, for example tonnes, m2, %, etc. |
| Display cents?: | Use this field to turn on or of the displaying of cents on the measurements. |
| Non-cumulative data entry: | This field allows you to change how you intend to enter the values for each measurement period: Accumulative means that you intend to enter accumulative values in the benefit over the measurement period e.g. 10, 20, 30, 40, etc. increasing by 10 every period. If you select Monthly that means you intend the just enter the value for each period and would like Psoda to add them together over the periods to get the accumulative values, e.g. you would might enter 10, 5, 0, 5, 0 and Psoda will calculate the accumulative values as 10, 15, 15, 20, 20 |
| Aggregation: | Use this drop-down list to select or change how you would like to aggregate information for this benefit. |
| (Expression): | This field will only be available to you if you have selected the “Expression” option in the aggregation field above. Here you can enter the expression in this field. See the help page on Benefits for a detailed description of aggregation and expressions. |
| Codename: | If you want to use this benefit in an underscore, lowercase letter or uppercase letter. The rest of the codename can contain underscores, letters or numbers. |
Original baseline VS Adjusted baseline
When this benefit was created, the creator should have entered details in the original baseline tab, which can be edited directly, or you can use the adjusted baseline tab to make comparisons between the original and adjusted. Both of these tabs present a list of the measurement intervals, as assigned in the Details tab. This allows you to assign measurements to each interval to build up or edit the original baseline and/or the adjusted baseline for this benefit.