
Figure 1 – Edit organisation popup form
The very first field ‘Organisation‘ at the top of this form is the name of the organisation. The name is unique across the whole system. If the name is edited to no longer be unique you will receive a warning when you submit the form. Note: this field has a * which indicates that is a mandatory field to be filled in. In Figure 1 above, the form has been broken down into two sections:| Section 1 | These are the tabs that you can cycle through to edit each section of the organisation.When you navigate to a new tabbed view in this popup, any information entered in Section 2 from the previous tabbed view will be saved. This means you do not need to click on any buttons to save each tab, but can instead click on the Update button at the bottom of the popup when all of your tab editing is completed. |
|---|---|
| Section 2 | This information will change as you cycle through the tabs shown in Section 1, and the fields to be edited will change accordingly. A breakdown of the field information for each tab is provided below. |
Tab breakdown
The following information provides a breakdown of each of the tabbed views that may be available for you to edit. It is good to note that any screenshots of these tabbed views will be have fields that are populated with the Psoda default values, any specific information for your organisation may vary. Please note that any fields listed in brackets, are visible only if another field has been selected. Contact details
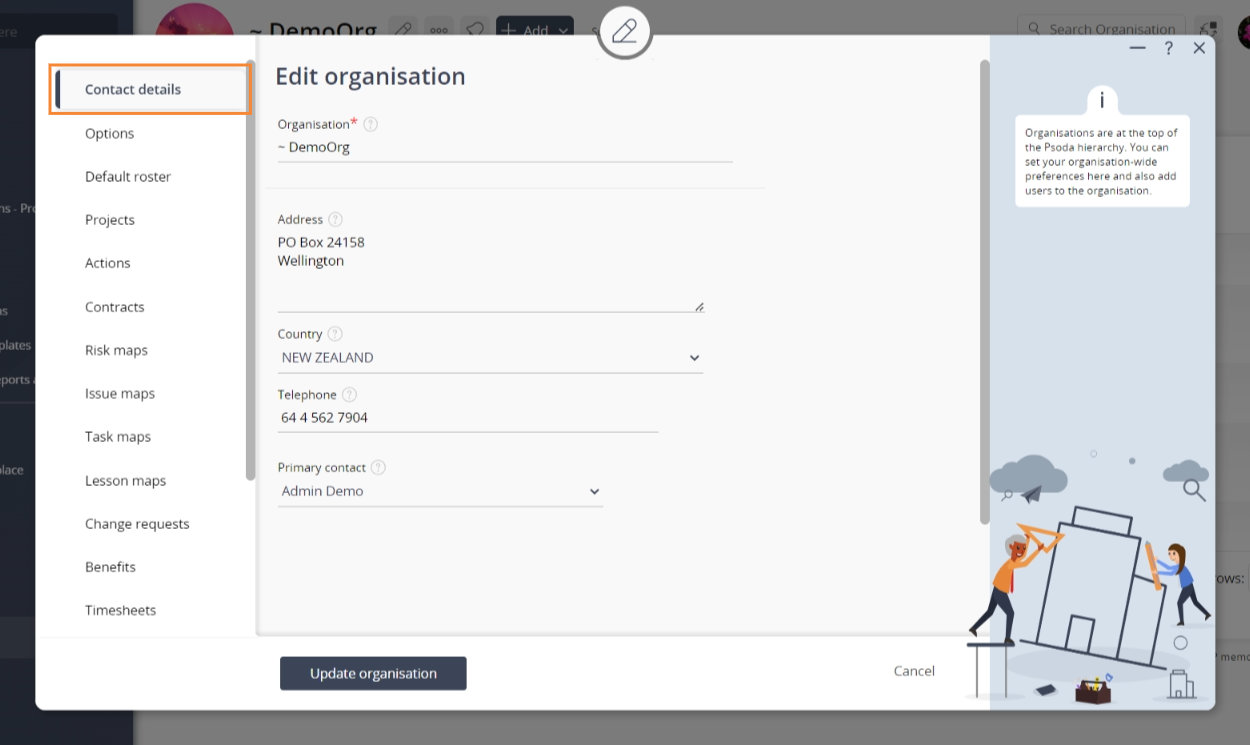
Figure 2 – Contact details tabbed view
The contact details for an organisation can be edited by clicking on the tab indicated in Figure 2 above. Each of the fields available to be edited in this tabbed view are described in the following table:| Address: | This is where you can edit or enter the address of the organisation, e.g. 1 Ball Street, Crockermouth |
|---|---|
| Country: | Use this drop-down list to select or change which country the organisation is registered in. |
| Telephone number: | This is where you can edit or enter the telephone number of the organisation, e.g. +11 22 33 44 55 |
| Fax number: | This is where you edit or enter the fax number of the organisation, e.g. +11 66 77 88 99 |
| Primary contact: | Select or change the primary contact for the organisation from the list of users |
Options
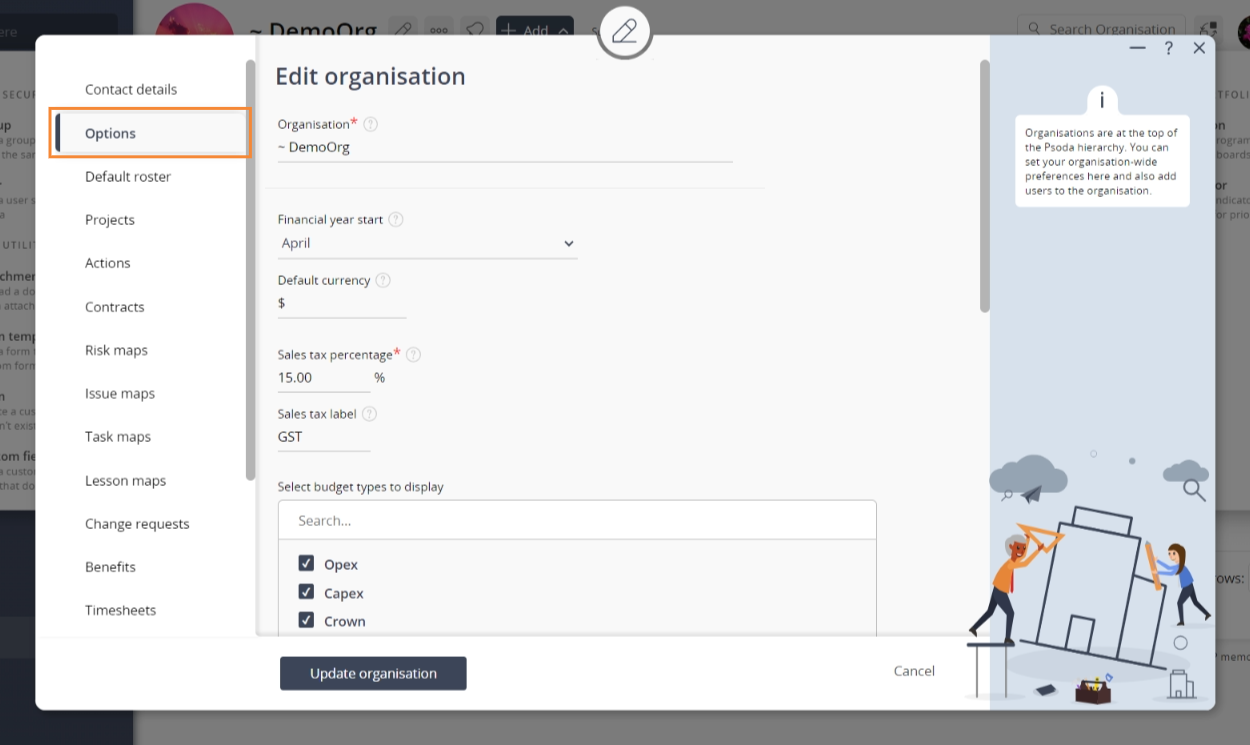
Figure 3 – Options tabbed view
The options for an organisation can be edited by clicking on the tab indicated in Figure 3 above. Each of the fields available to be edited in this tabbed view are described in the following table:| Financial year start: | Select or change the month that your financial year starts. This month is used in calculating year-to-date financial values. |
|---|---|
| Default currency: | Use this text box to edit the default currency for this organisation, for example NZ$ or GBP. |
| Sales tax percentage*: | Use this text box to edit the default sales tax percentage when adding expense items, for example 15%. |
| Sales tax label: | Use this text box to edit the label used for sales tax, for example VAT or GST. |
| First day of the week: | Select or change the first day of the week appropriate for this organisation. |
| Default project types: | Enter or edit a comma separated list of project types that should be available by default in the drop-down list when adding/editing projects. |
| Cost allocation programmes: | Use this drop-down list to select or change which programmes to include for cost allocation. The default is to disable cost allocation. |
| Default user tab: | Use this drop-down list to select or change which user tab you would like to set as the default. Psoda’s default is to have this option selected to be the ACL tab. |
 Default roster
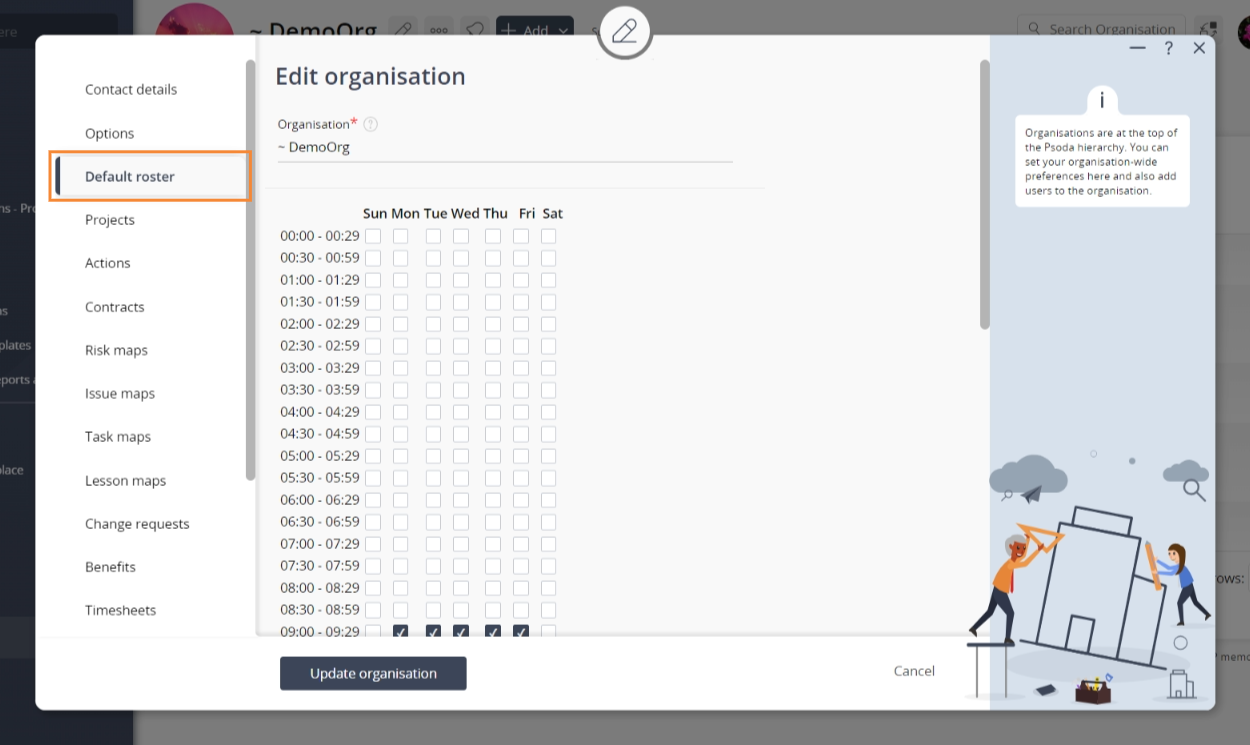 Figure 4 – Default Roster tabbed view
The default roster for an organisation can be edited by clicking on the tab indicated in Figure 4 above.
Here the working/non-working times can be edited by checking or un-checking any half-hour slots for each day of the week. Contracts
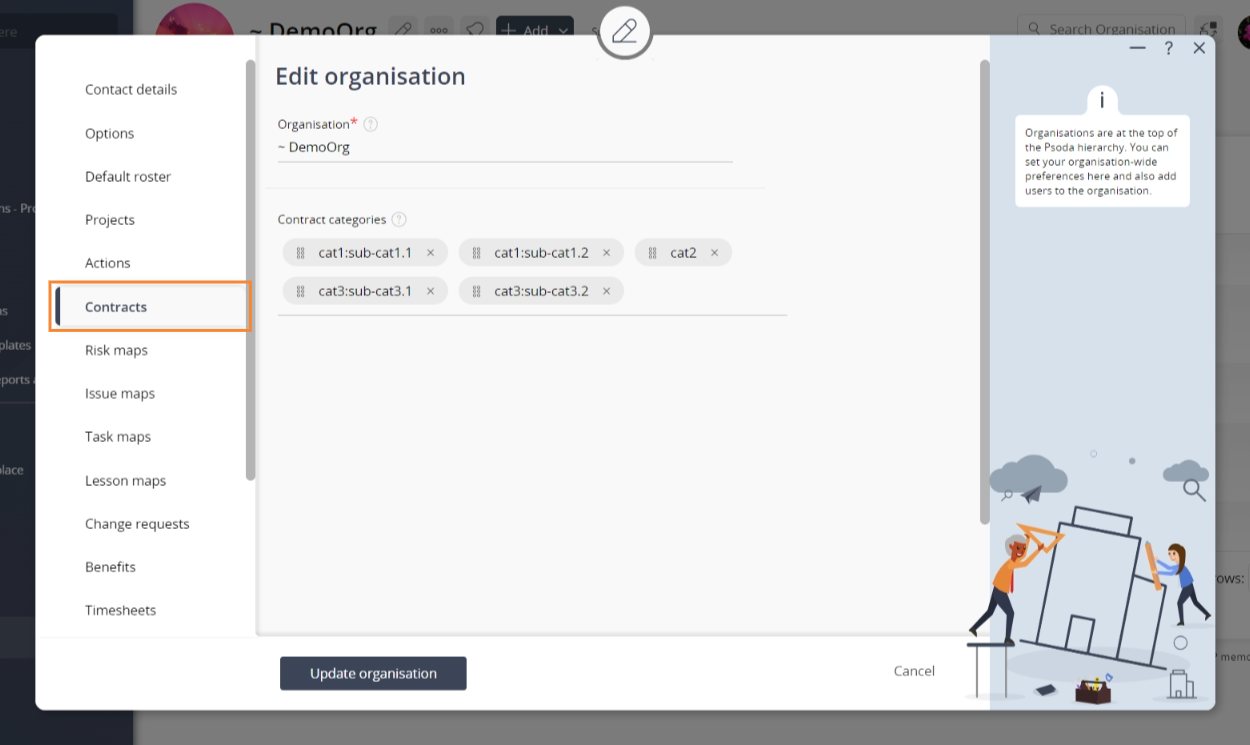
Figure 5 – Contracts tabbed view
The contracts for an organisation can be edited by clicking on the tab indicated in Figure 5 above.
Here, contract categories can be added, edited or removed from a comma separated list that may already be present in this text box, or a fresh list can be generated.
 Risk maps
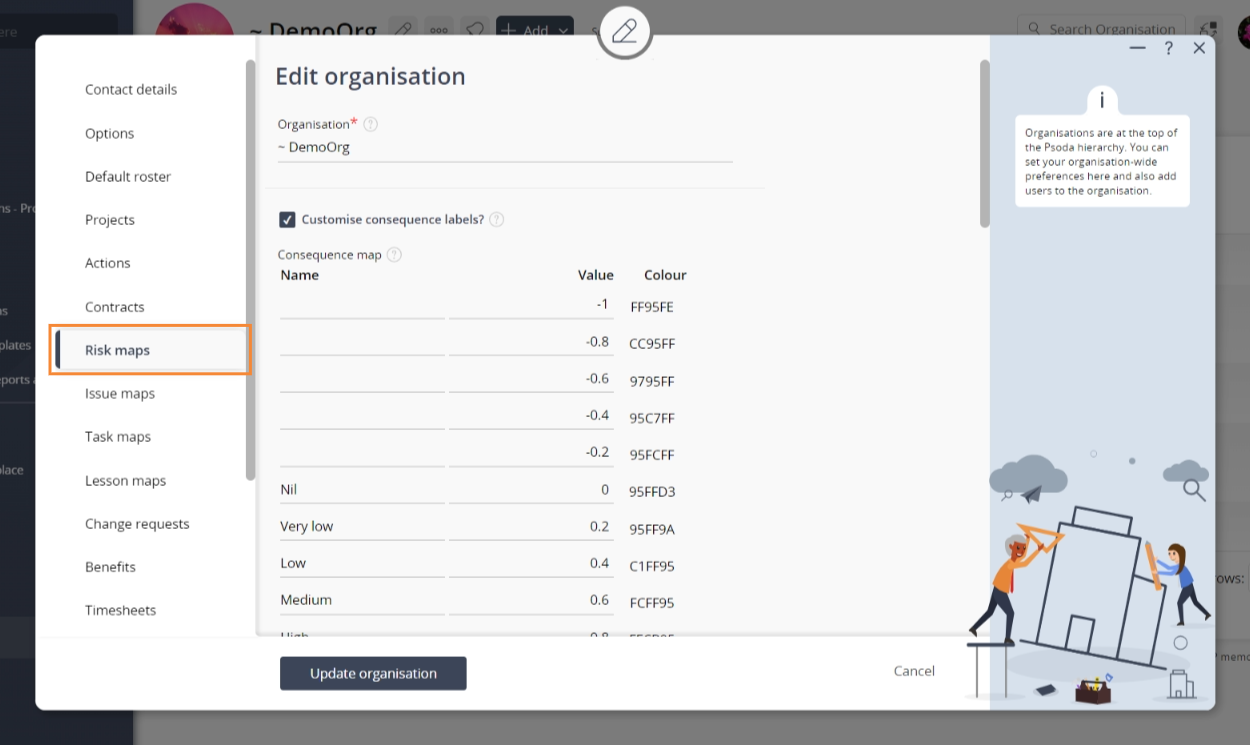
Figure 6 – Risk Maps tabbed view
The risk maps for an organisation can be edited by clicking on the tab indicated in Figure 6 above. Each of the fields available to be edited in this tabbed view are described in the following table:
| Customise consequence labels: | Set this checkbox if you would like to customise the impact labels used for risks. |
|---|---|
| (Consequence map): | If you have selected the customise consequence labels above, then these 6 fields allows the names and values of these consequence labels to be edited. The values can be any positive number, e.g. 0, 0.2, 2, 20 etc. These values must be in sequence with the smallest number at the top and the largest number at the bottom. |
| Customise likelihood labels: | Set this checkbox if you would like to customise the probability labels used for risks. |
| (Likelihood map): | If you have selected the customise likelihood labels above, then these 6 fields allows the names and values of these consequence labels to be edited. The values can be any positive number, e.g. 0, 0.2, 2, 20 etc. These values must be in sequence with the smallest number at the top and the largest number at the bottom. |
| Customise risk labels: | Set this checkbox if you would like to customise the labels used for the overall risk. |
| (Risk map): | If you have selected the customise risk labels above, then these 6 fields allows the names and values of these consequence labels to be edited. The values can be any positive number, e.g. 0, 0.2, 2, 20 etc. These values must be in sequence with the smallest number at the top and the largest number at the bottom. |
| Risk categories: | Enter or edit a comma separated list of categories that should be available by default in the drop-down list when adding/editing risks. |
| Risk strategies: | Enter or edit a comma separated list of strategies that should be available by default in the drop-down list when adding/editing risks. |
 Issue maps
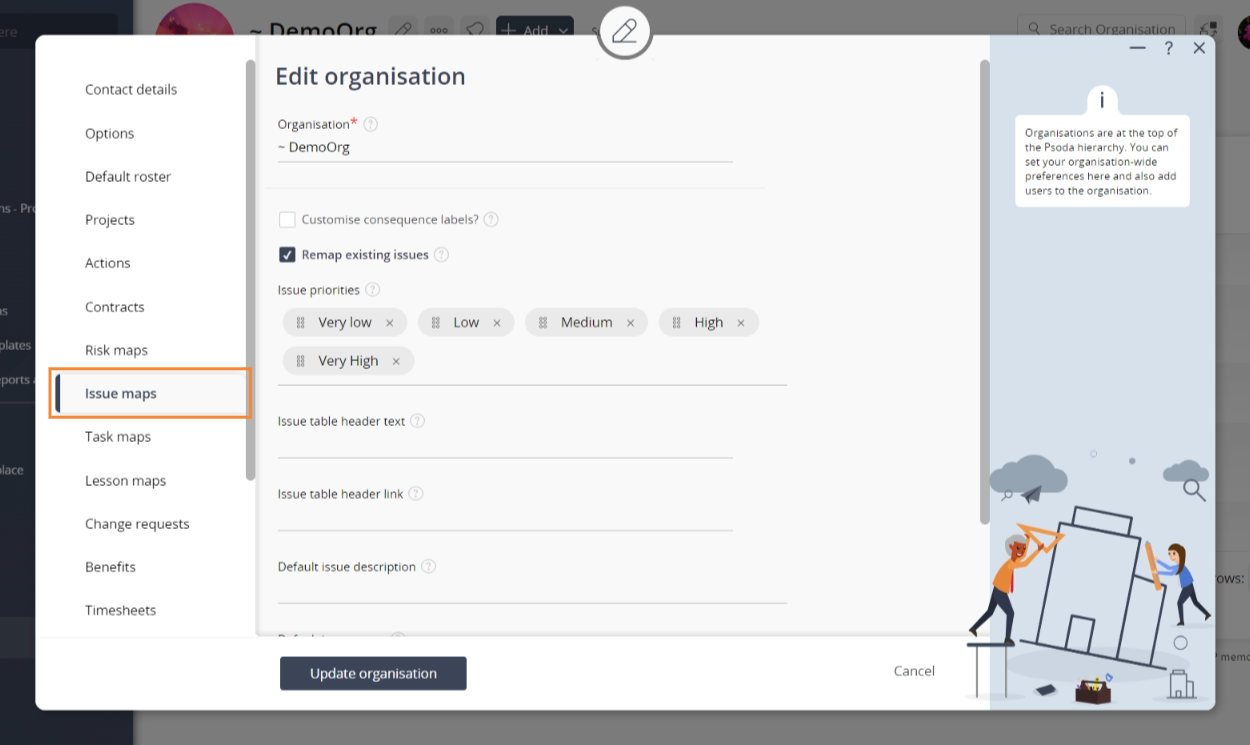
Figure 7 – Issue Maps tabbed view
The issue map for an organisation can be edited by clicking on the tab indicated in Figure 7 above.
If you have selected the customise consequence labels in this tabbed view, then the consequence map which is comprised of 6 fields is shown to allow the names and values of these consequence labels to be edited. The values can be any positive number, e.g. 0, 0.2, 2, 20 etc. These values must be in sequence with the smallest number at the top and the largest number at the bottom.
 Task maps
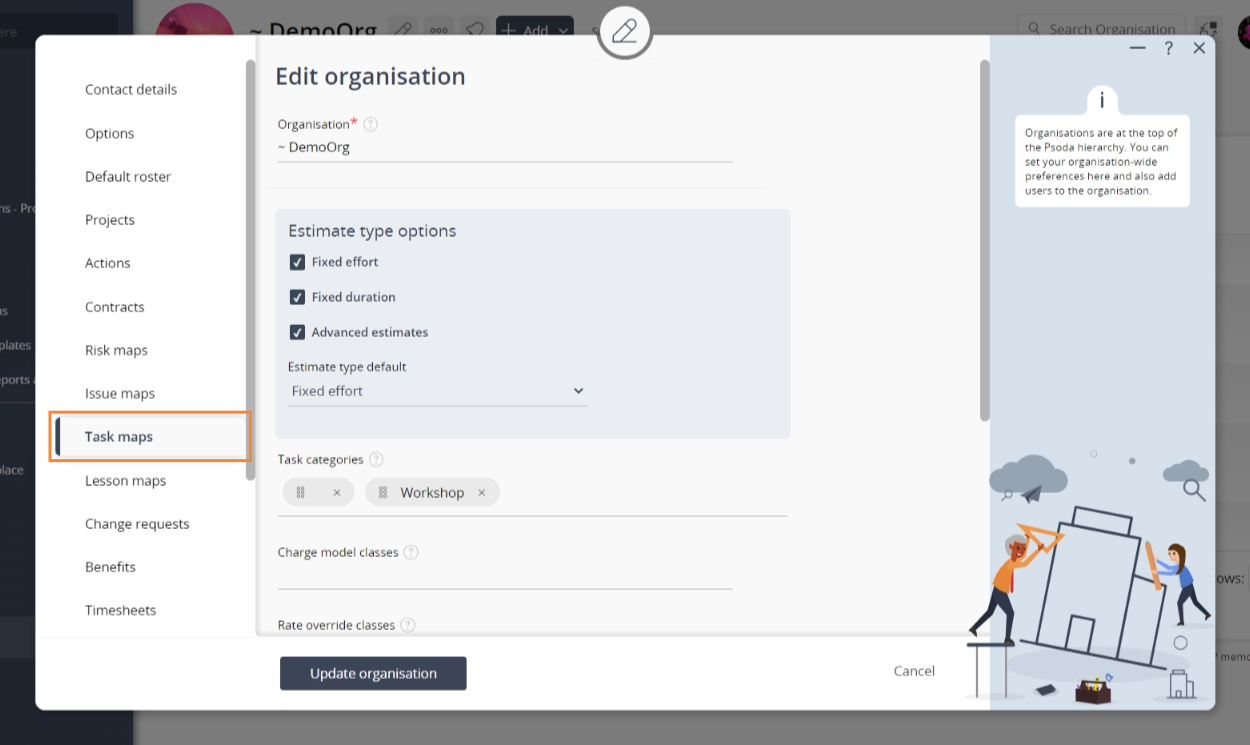
Figure 8 – Task Maps tabbed view
The task map for an organisation can be edited by clicking on the tab indicated in Figure 8 above.
In the task categories field in this tabbed view, enter or edit a comma separated list of categories that should be available by default in the drop-down list when adding/editing tasks.
 Lesson maps
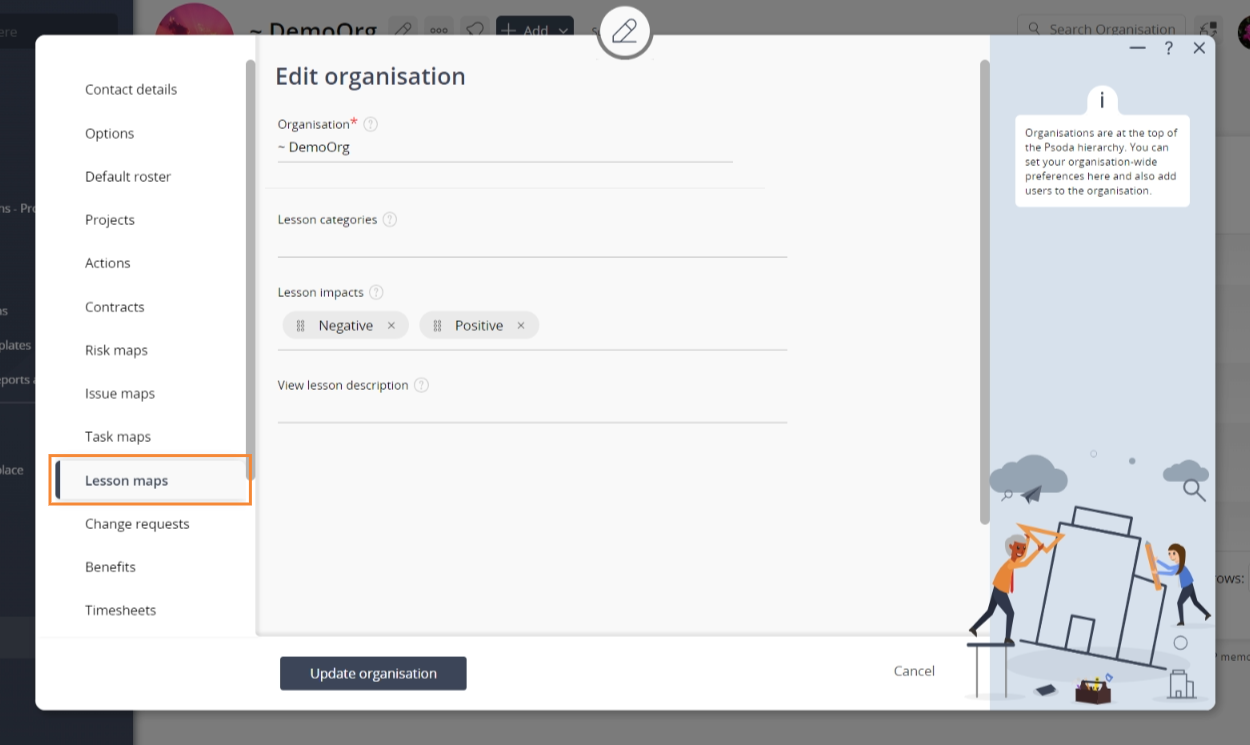
Figure 9 – Lesson Maps tabbed view
The lesson maps for an organisation can be edited by clicking on the tab indicated in Figure 9 above. The two fields available to be edited in this tabbed view are described in the following table:
| Lesson categories: | Enter or edit a comma separated list of categories that should be available by default in the drop-down list when adding/editing lessons. |
|---|---|
| Lesson impacts: | Enter or edit a comma separated list of impacts that should be available by default in the drop-down list when adding/editing lessons. |
 Change Requests
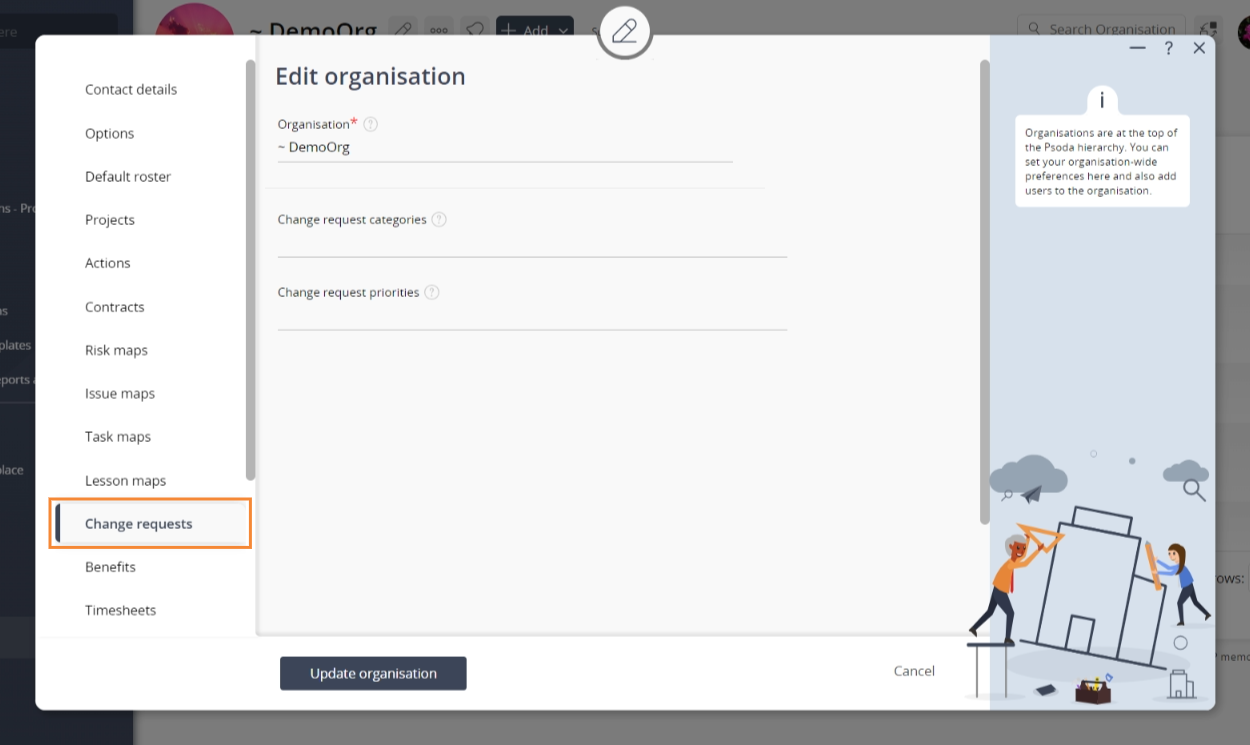
Figure 10 – Change Requests tabbed view
The change requests for an organisation can be edited by clicking on the tab indicated in Figure 10 above. The two fields available to be edited in this tabbed view are described in the following table:
| Change request categories: | Enter or edit a comma separated list of categories that should be available by default in the drop-down list when adding/editing change request. |
|---|---|
| Change request priorities: | Enter or edit a comma separated list of priorities that should be available by default in the drop-down list when adding/editing change request. |
Benefits
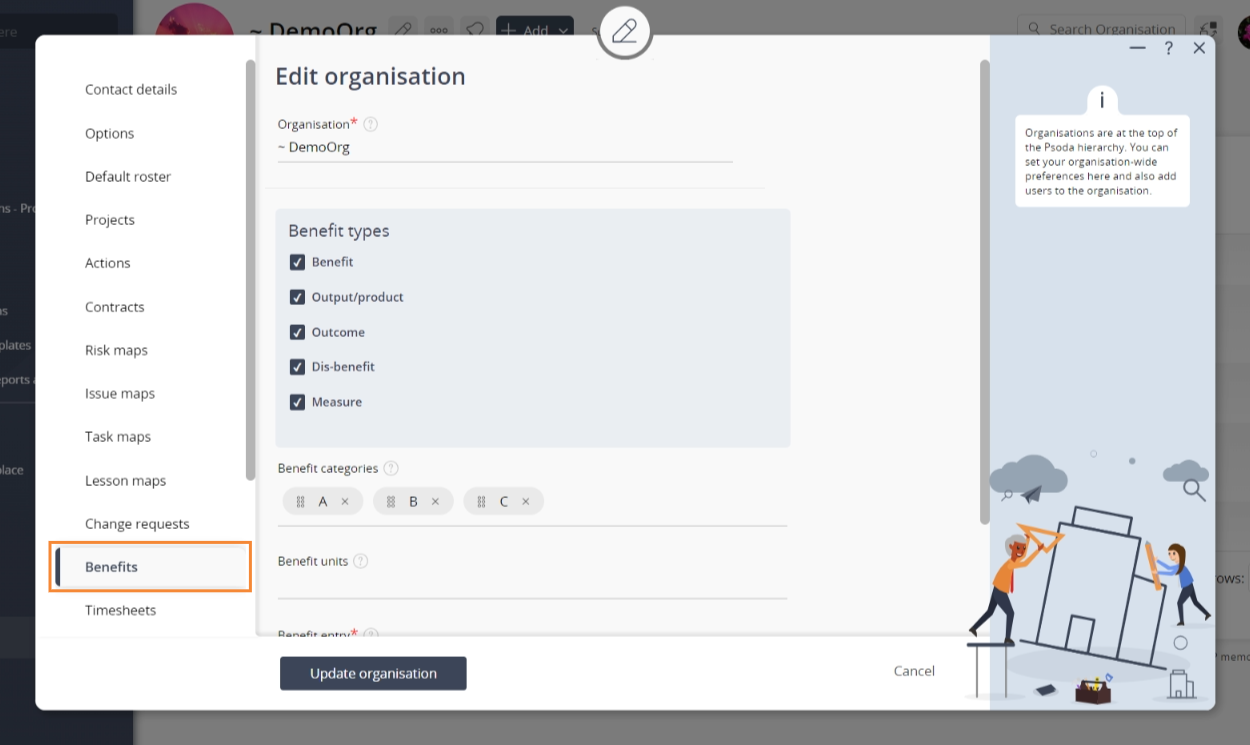
Figure 11 – Benefits tabbed view
The change requests for an organisation can be edited by clicking on the tab indicated in Figure 11 above. The four fields available to be edited in this tabbed view are described in the following table:
| Benefit categories: | Enter or edit a comma separated list of categories that should be available by default in the drop-down list when adding/editing benefit. |
|---|---|
| Benefit entry: | This field lets you pick the default value for when creating a new benefit. Accumulative means that you intend to enter accumulative values in the benefit over the measurement period e.g. 10, 20, 30, 40, etc. increasing by 10 every period. If you select Monthly that means you intend the just enter the value for each period and would like Psoda to add them together over the periods to get the accumulative values, e.g. you would might enter 10, 5, 0, 5, 0 and Psoda will calculate the accumulative values as 10, 15, 15, 20, 20. |
| Show cents option when create/editing benefits: | This field is used to show or hide the “show cents?” when editing or adding a benefit. |
| Default show cents: | If this is ticked when adding a benefit the “show cents?” will automatically be ticked, if it is not ticked then the “show cents” will be unticked by default when adding new benefits. If Show cents option when create/editing benefits is not ticked then if this is ticked all benefits will display cents, if unticked all benefits will not show cents. |
 Timesheets
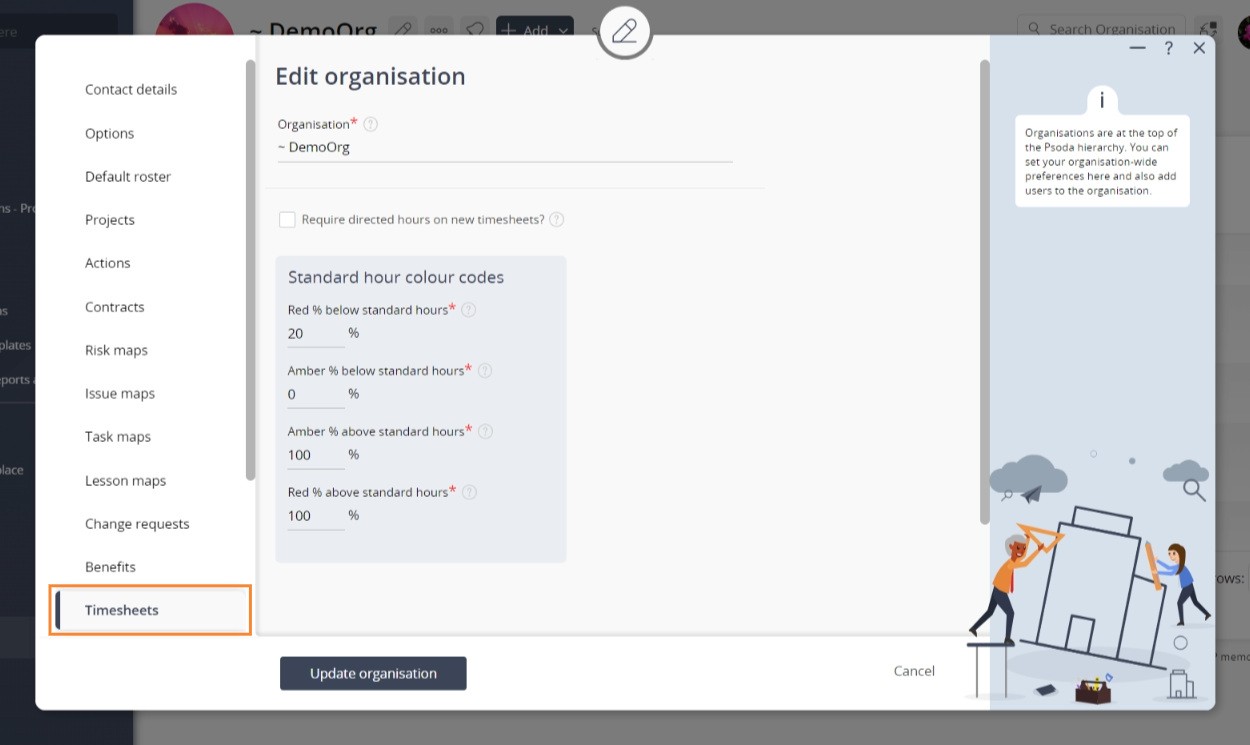
Figure 12 – Timesheets tabbed view
The timesheets for an organisation can be edited by clicking on the tab indicated in Figure 12 above.
This tabbed view presents a require directed hours on new timesheets checkbox option that can be checked or un-checked according to your preference for the organisation’s timesheets.
 Leave settings
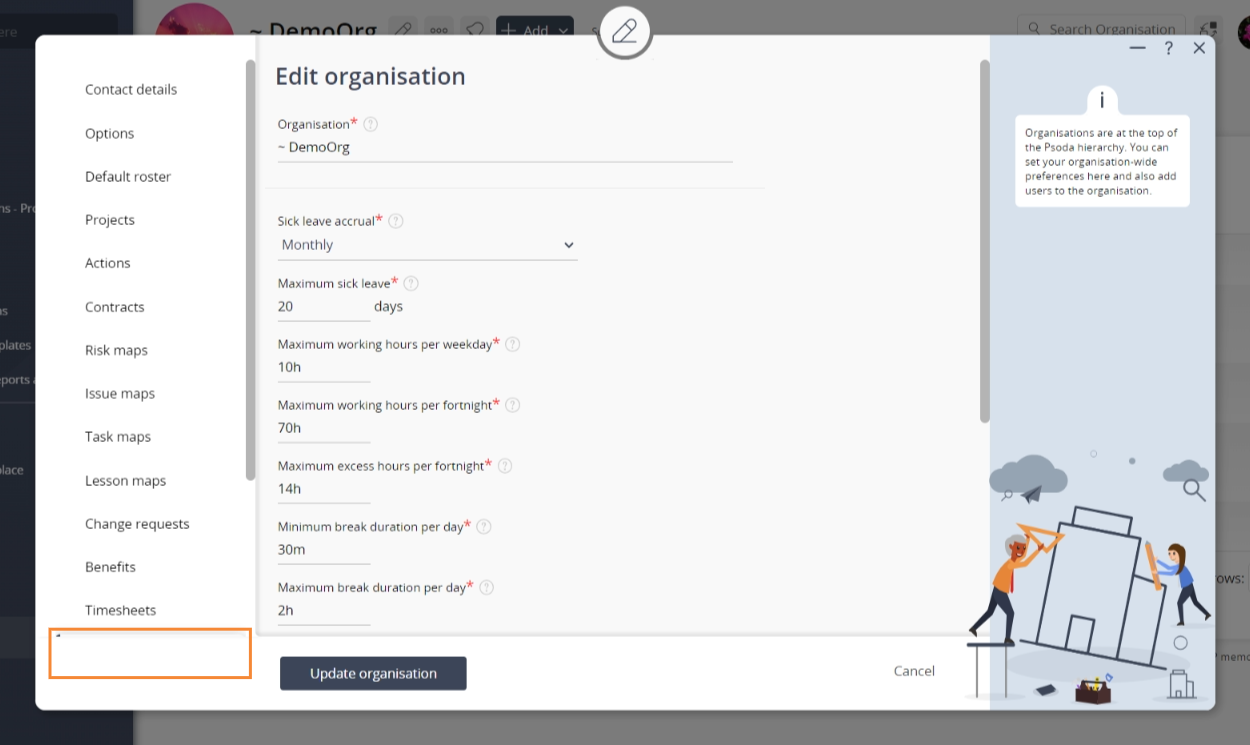
Figure 13 – Leave Settings tabbed view
The leave settings for an organisation can be edited by clicking on the tab indicated in Figure 13 above. Each of the fields available to be edited in this tabbed view are described in the following table:
| Sick leave accrual*: | Use the drop-down list to select or change the sick leave accrual algorithm that you want to use for this organisation. The legal requirement in New Zealand is to use the 6 month anniversary algorithm. |
|---|---|
| Maximum sick leave*: | Enter or edit the maximum number of sick leave days that a user can accrue. |
| Maximum working hours per weekday*: | Enter or edit the maximum number of working hours that a user can log in a working day. |
| Maximum working hours per fortnight*: | Enter or edit the maximum number of working hours that a user can log in a fortnight. |
| Maximum excess hours per fortnight*: | Enter or edit the maximum number of excess hours a user can log in a fortnight. |
| Minimum break duration per day*: | Enter or edit the minimum total duration of breaks during a normal business day. |
| Maximum break duration per day*: | Enter or edit the maximum total duration of breaks during a normal business day. |
| Business Day TOIL accrual rate*: | Enter or edit the TOIL accrual rate for excess hours on a normal business day. |
| Weekend TOIL accrual rate*: | Enter or edit the TOIL accrual rate for excess hours over a weekend. |
| Public Holiday TOIL accrual rate*: | Enter or edit the TOIL accrual rate for excess hours on a public holiday. |
| Reset accrued TOIL hours every quarter?*: | Check or uncheck this tickbox if you wish to change whether or not the accrued TOIL hours are reset every quarter. |
| Maximum TOIL hours per financial year?*: | Enter or edit the maximum number of TOIL hours that can be accrued in the financial year. |
| Maximum TOIL hours per quarter?*: | Enter or edit the maximum number of TOIL hours that can be accrued in the quarter. |
 Defect maps

Figure 14 – Defect Maps tabbed view
The defect maps for an organisation can be edited by clicking on the tab indicated in Figure 14 above. Each of the fields available to be edited in this tabbed view are described in the following table:
| Defect types: | Enter or edit a comma separated list of types that should be available by default in the drop-down list when adding/editing defects. |
|---|---|
| Defect modules: | Enter or edit a comma separated list of modules that should be available by default in the drop-down list when adding/editing defects. |
| Defect versions: | Enter or edit a comma separated list of versions that should be available by default in the drop-down list when adding/editing defects. |
| Defect builds: | Enter or edit a comma separated list of builds that should be available by default in the drop-down list when adding/editing defects. |
| Customise severity labels: | Check or un-check this box if you would like to customise the severity labels used for defects. |
| (Severity map): | This section comprised of 6 additional fields will become visible if you have selected the customise severity labels checkbox. These additional fields allow you to enter or edit the labels and the values for each label. The values can be any positive number, e.g. 0, 0.2, 2, 20 etc. These values must be in sequence with the smallest number at the top and the largest number at the bottom. |
| Defect resolutions: | Enter or edit a comma separated list of resolutions that should be available by default in the drop-down list when adding/editing defects. |
| Defect priorities: | Enter or edit a comma separated list of priorities that should be available by default in the drop-down list when adding/editing defects. |
 Security
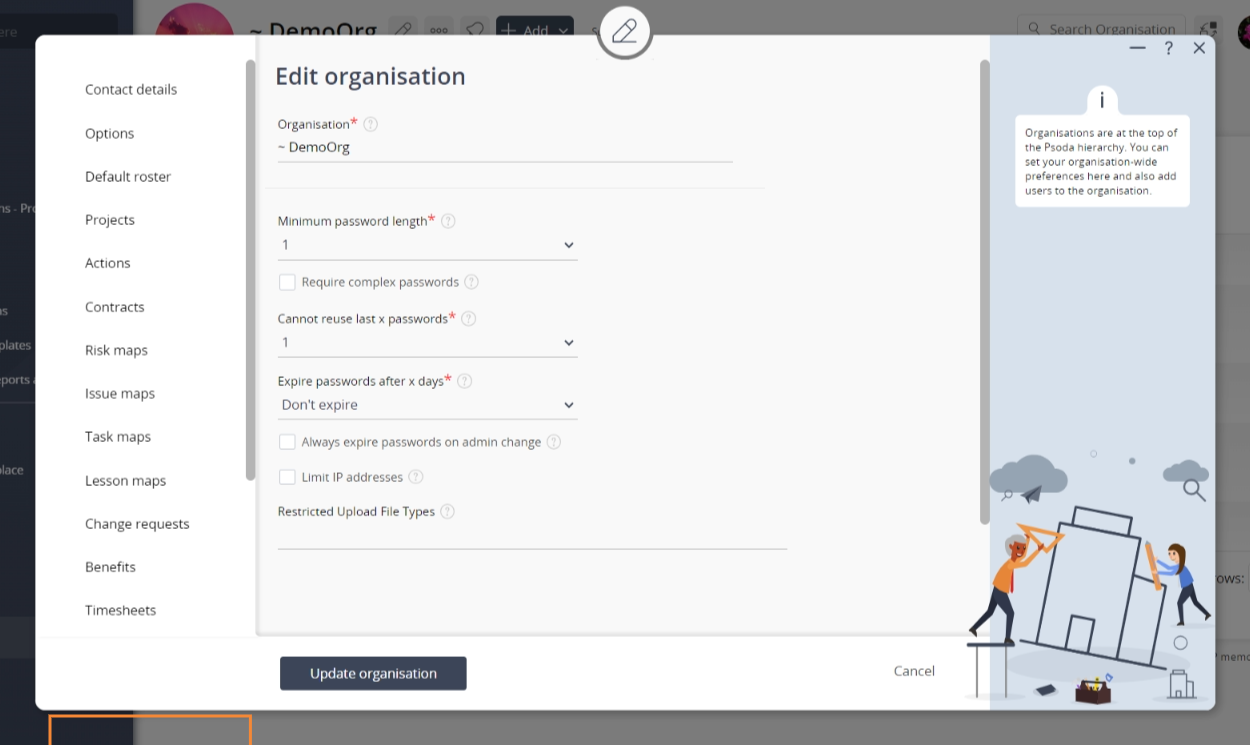
Figure 15 – Security tabbed view
The security for an organisation can be edited by clicking on the tab indicated in Figure 15 above. Each of the fields available to be edited in this tabbed view are described in the following table:
| Minimum password length*: | Use this drop-down list to select or change the minimum number of characters that need to be used when creating passwords. |
|---|---|
| Require complex passwords*: | Check or uncheck this box to edit whether you want users in this organisation to have complex passwords only. |
| Cannot reuse last x passwords*: | Use this drop-down list to select or change the number of past passwords that cannot be reused. |
| Expire passwords after x days*: | Use this drop-down list to select or change the number of days until passwords expires. Note that there is an option to not allow the passwords to expire. |