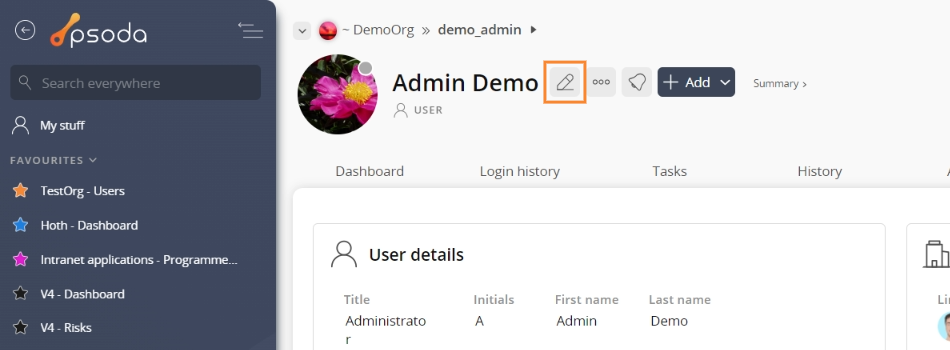
Figure 1 – Access via edit button
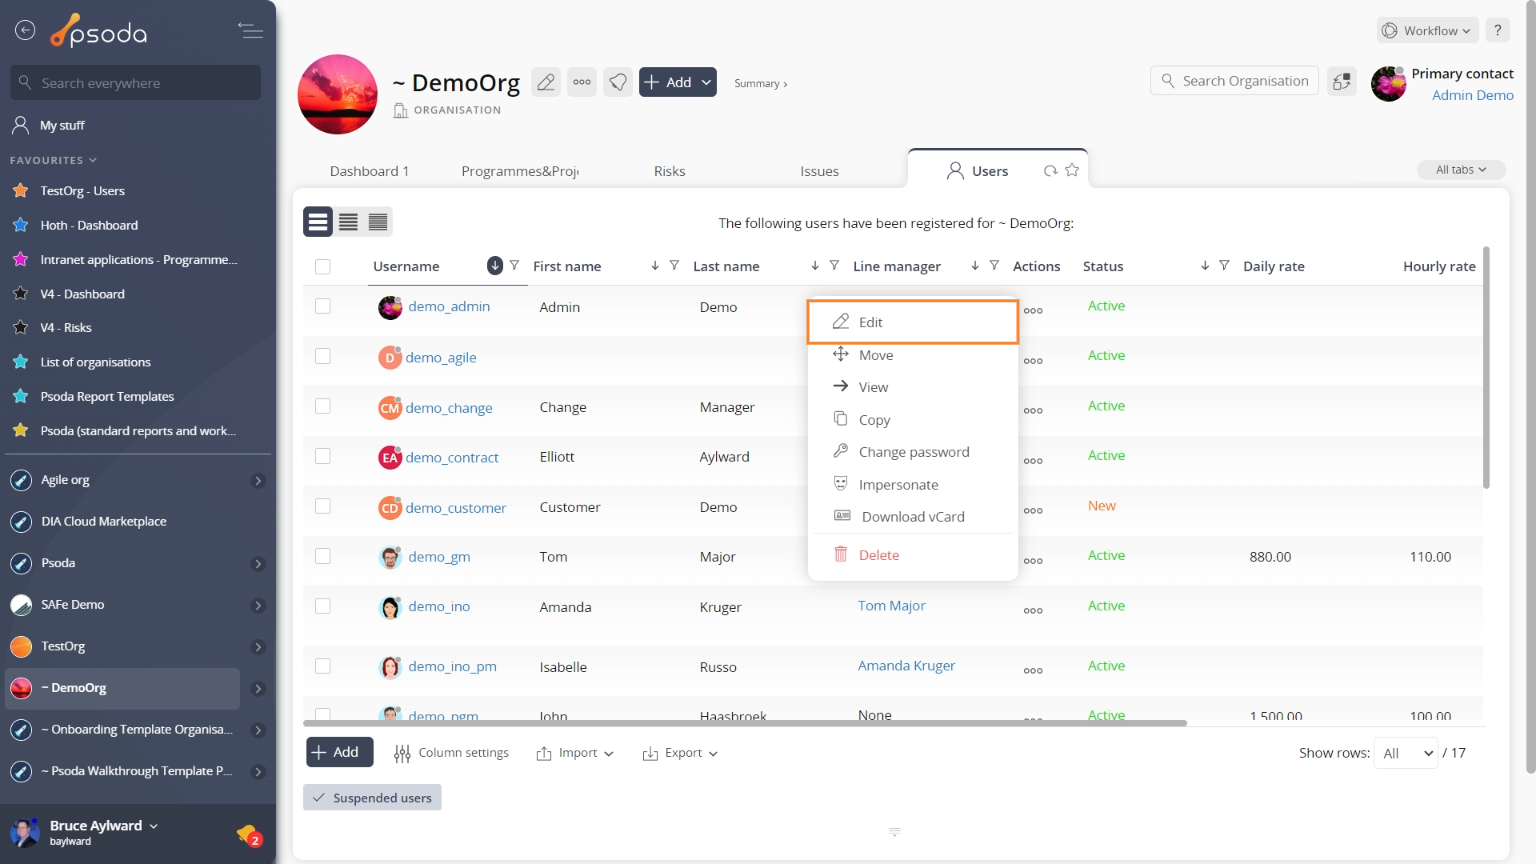
Figure 2 – Access via user tab
This popup is shown in Figure 3 and is used to edit an existing
Figure 3 – Edit user form
In Figure 3 above, the form has been broken down into three sections:
| Section 1 |
Username*:This is where you may edit the username for this user you want to add. The username must stay unique across the whole system. If you type in a username which is not unique you will be given a warning message. Normally a user’s email address is used as their username to ensure that it will be unique. |
|---|---|
| Section 2 | These are the tabs that you can cycle through to edit each section of the organisation. When you navigate to a new tabbed view in this popup, any information entered in Section 3 from the previous tabbed view will be saved. This means you do not need to click on any buttons to save each tab, but can instead click on the Update button at the bottom of the popup when you wish to add your new user with the set details. |
| Section 3 | This information will change as you cycle through the tabs shown in Section 2, and the available fields will change accordingly. A breakdown of the field information for each tab is provided below. |
 Details
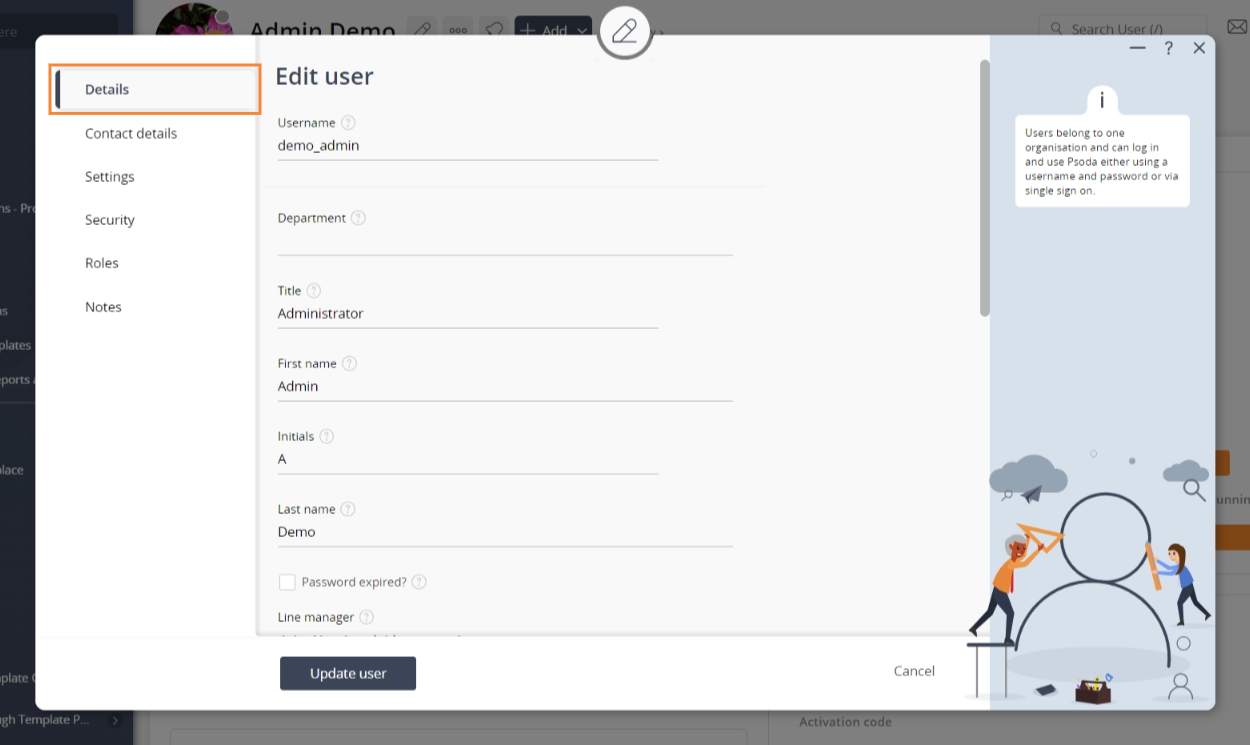
Figure 5 – Edit user details tab
The details for the user can be assigned or adjusted by clicking on the tab indicated in Figure 5 above. Each of the fields available to be customised in this tabbed view are described in the following table:| Department: | Enter or edit this user’s department here, for example R&D. |
|---|---|
| Title: | Enter or edit this user’s title here, for example Mr. |
| First name: | Enter or edit this user’s first name here, for example John. |
| Initials: | Enter or edit this user’s initials here, for example JS. |
| Last name: | Enter or edit this user’s last name here, for example Smith |
| New password: | Enter or edit this user’s login password here. Although you can add a user with no password that user will not be able to log into Psoda until a valid password has been set for them. |
| Repeat new password: | Repeat the login password here to check that it was typed correctly. |
| Password expired: | Select this check box if you want to set the user’s password as expired and so that it must be changed after the first time the new user logs in. |
| Line manager: | Select or change the line manager for this user from the drop-down list. When this user submits timesheets or leave applications they will be allocated to the selected line manager. |
| Custom fields: | The form may include a number of custom fields that were added by your administrator(s) specifically for your organisation. |
| Start date: | Enter or edit the date that this user will start using one of the preset date formats or select the date using |
| End date: | Enter or edit the date, using one of the preset date formats, that this user will no longer need access to Psoda, for example if the user is leaving the organisation. You may also select the date using |
| Status: | This field will only be visible if you have sufficient access rights. This drop-down list can be used to select or change the state for this user. Refer to the users help page for details on the different states. |
Contact details
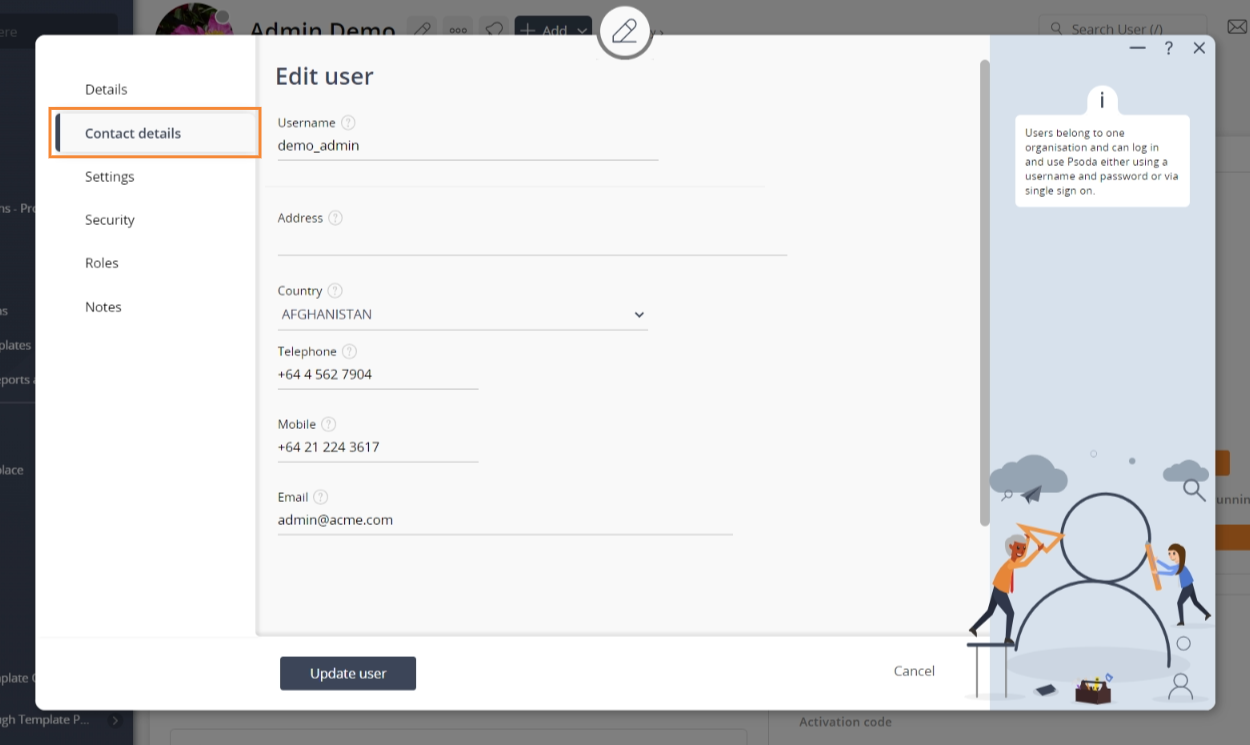 Figure 6 – Edit user contact details
The contact details for the user can be assigned or adjusted by clicking on the tab indicated in Figure 6 above. Each of the fields available to be customised in this tabbed view are described in the following table:
| Address: | Enter or edit this user’s physical address here. |
|---|---|
| Country: | Select or change this user’s country from this drop-down list. |
| Telephone number: | Enter or edit this user’s direct dial telephone number here, for example +64 1 234 5678 |
| Mobile number: | Enter or edit this user’s mobile or cellphone number here, for example +64 21 123 4567 |
| Email address: | Enter or edit this user’s email address here, for example john.smith@psoda.com – This field is required for the user to receive email alerts and notifications as well as logout and password reset emails. |
 Settings
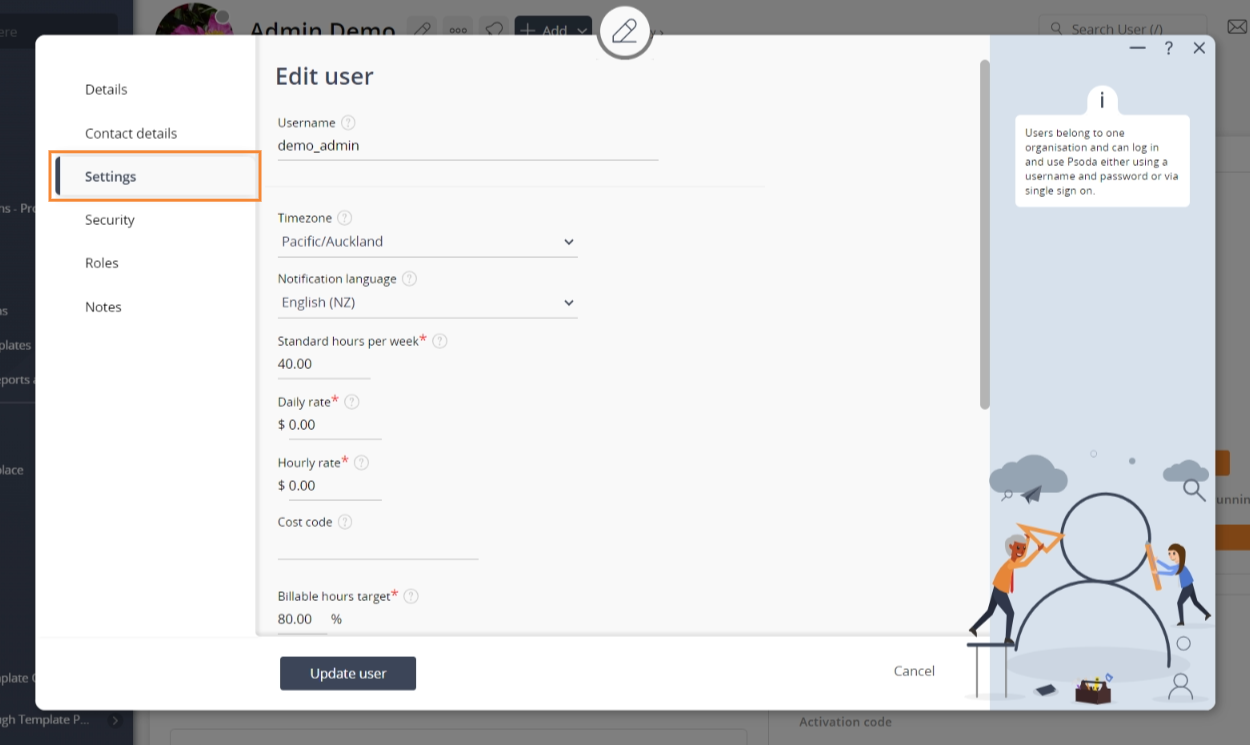 Figure 7 – Edit user settings tab
The settings for the user can be assigned or adjusted by clicking on the tab indicated in Figure 7 above. Each of the fields available to be customised in this tabbed view are described in the following table:
| Timezone: | Select or change the a timezone for this user using this drop-down list. This timezone will be used to display all timestamps in the system when this user is logged in. By default the timezone is set to UTC. |
|---|---|
| Notification language: | Select or change this user’s preferred language using this drop-down list. This language will be used when sending email alerts or notifications to the user. |
| Standard hours per week: | This setting is used to highlight this user’s timesheets when they have not logged their standard hours per week yet. |
| Daily rate: | This field will only be visible if you have sufficient access rights. Set or change the daily rate for this user here. The rate currency can be changed by editing the organisation details. |
| Hourly rate: | This field will only be visible if you have sufficient access rights. Set or change the hourly rate for this user here. The rate currency can be changed by editing the organisation details. |
| Cost code: | Enter or edit the cost code related to this user here. This code can be included in data exported to a Financial Management Information System to identify this user. |
| Leave allowance*: | This field will only be visible if you have sufficient access rights. Set or change the yearly leave allowance for this user here. The yearly allowance will be divided by 12 and added to the user’s available leave automatically every month. |
| Leave available: | This field will only be visible if you have sufficient access rights. This field shows the leave available for this user. The allowance for the user will be added every month and any approved leave will be subtracted from this number. |
| Sick leave allowance: | This field will only be visible if you have sufficient access rights. Set or change the yearly sick leave allowance for this user here. The yearly allowance will be divided by 12 and added to the user’s available sick leave automatically every month. |
| Sick leave available: | This field will only be visible if you have sufficient access rights. This field shows the sick leave available for this user. The allowance for the user will be added every month and any approved sick leave will be subtracted from this number. |
| Over contracted running balance: | Set or change the current running balance for over contracted hours here. |
| TOIL approved: | Set or change the running balance for TOIL hours that have been approved here. |
 Security
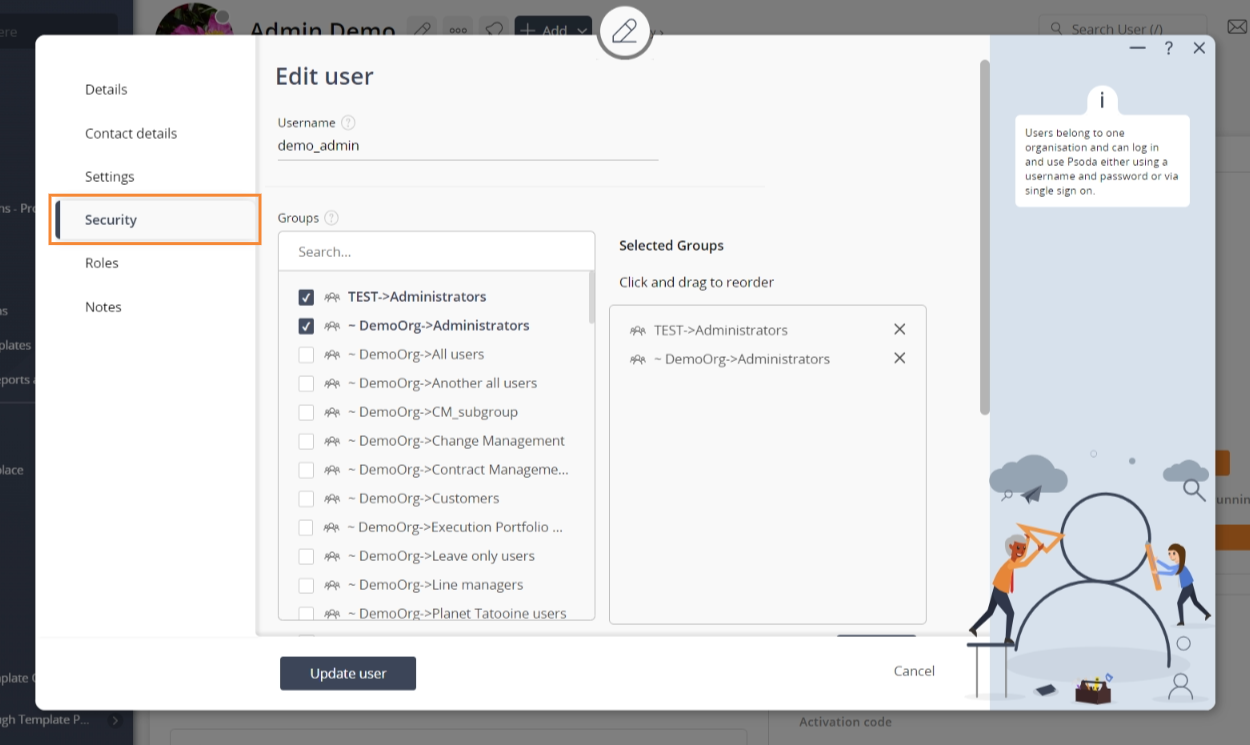 Figure 8 – Add user security tab
The security for the user can be assigned or adjusted by clicking on the tab indicated in Figure 8 above. Each of the fields available to be customised in this tabbed view are described in the following table:
Ignore IP address:A security feature of Psoda is to immediately log a user out if their session IP address suddenly changes. This could happen if a potential hacker is trying to impersonate that user. Networks with proxy servers or NAT facilities may present multiple IP addresses to the internet. This could cause a ligitimate user to be logged out from time-to-time. If this is happening try to select this check box so that Psoda will ignore changes in the IP address.| Groups: | This field will only be visible if you have sufficient access rights. This field will only be visible is more than one group is defined for the organisation. You can select more than one group using the shift or CTRL keys. The user will be added as a member to every group you select. If you want to de-select a group, select the highlighted group while still holding the shift or CTRL keys. If only one group is defined for the organisation then every new user will automatically be added as a member of that group. |
|---|---|
| Licence selector: | This field will only be visible if you have sufficient access rights. This area is used to select or change the licences this user can have read or write access to or no access at all. For details on each of the licences see the help page for the licence selector. |
| SAML/ADFS logins only: | Forces this user to only log into Psoda via your organisation’s Single Sign On. This option will only be visible if your organisation has Single Sign On configured. |
| Two Factor Authentication required: | The Two Factor Authentication security option allows user’s to have an extra layer of security when logging in. After you enter your password, a 5 digit code will be emailed to your accounts email. This code then has to be entered for you to successfully login to Psoda. To learn more details about Two Factor Authentication see the help page for Two Factor Authentication. |
 Notes
Notes
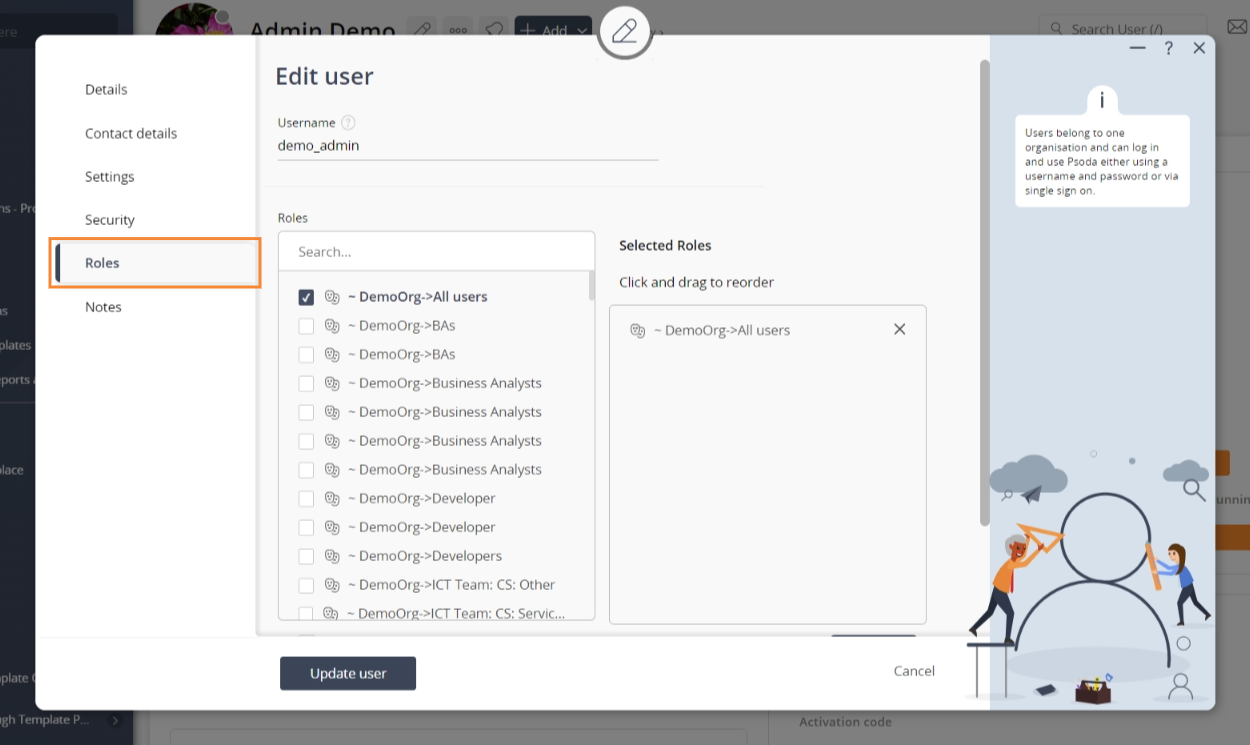 Figure 9 – Add user notes tab
The notes for the user can be assigned or adjusted by clicking on the tab indicated in Figure 9 above.
Here you can enter or edit any extra notes about this user. Once you are happy with your entries click the “Update user” button at the bottom of the form. This will update the user with the details that you supplied. Click the Cancel button if you no longer want to update the user’s details.